dpkg --list | grep "^rc" | cut -d " " -f 3 | \
	xargs sudo dpkg --purge
Showing posts with label debian. Show all posts
Showing posts with label debian. Show all posts
Saturday, August 27, 2022
Debian: Clean up dpkg rc packages
rc means that the package is not completely removed.

Monday, August 22, 2022
Debian: Possible missing firmware
If you encounter issue like the following, you need to download/update firmware files.
W: Possible missing firmware /lib/firmware/i915
Monday, August 4, 2014
wheezy web: deploy nginx + uwsgi + memcached
wheezy.web is a lightweight, high performance, high concurrency WSGI web framework with the key features to build modern, efficient web. Here we will deploy quick start with nginx, uwsgi and memcached to clean debian stable installation.
Thursday, November 14, 2013
How to build Python deb package from source
You need a newer python version that is not available with the Debian package management system. You can compile it from source and install but that usually takes a lot of time. It would be better to build a deb instead and install it on as many machines as you need. You can use checkinstall for this.
apt-get install checkinstallThe instruction how to compile python from source is here. Once you compiled python here is a simple command that does the rest for you:
checkinstall -y --pkgname=python2.7Once it finishes you will get a deb file in the current directory. You can install it this way:
dpkg -i python2.7_2.7.6-1_i386.debHere is how to remove it:
apt-get remove --purge python2.7Note, packages built with checkinstall are not updated by OS package management system, thus updates need to be provided manually.
Wednesday, October 23, 2013
PostgreSQL Streaming Replication Hot Standby
Streaming replication allows a standby server to stay up-to-date with primary. The standby connects to the primary, which streams WAL records to the standby as they're generated.
Hot standby is the term used to describe the ability to connect to the server and run read-only queries.
This method of replication is completely transparent to the client, it doesn't require any changes to database, allows query information from standby server and requires minimum administrative effort.
Hot standby is the term used to describe the ability to connect to the server and run read-only queries.
This method of replication is completely transparent to the client, it doesn't require any changes to database, allows query information from standby server and requires minimum administrative effort.
Monday, October 15, 2012
Python Web Reverse URLs Benchmark
How fast python web frameworks reverse urls? While routing is a mapping of incoming request to a handler, url reverse function is designed to build urls for those handlers. A web page may have a number of urls from few dozen to hundreds... all related to your web site (e.g. links between related pages, tag cloud, most viewed posts, etc). A typical web application usually has deal with the following reverse url use cases:

- Static: the URL path is fixed and never changes, e.g. https://bitbucket.org/explore.
- Merge: the URL path is constructed dynamically, some information is taken from URL. A `user page` shows repositories. In this case a list of user repositories will be constructed as merge of information that came from URL (user name) and repository name.
- Route: the URL path is constructed dynamically, all information can be taken from URL. A `repository page` displays a number of features: downloads, source, etc. Those links include current route information (user name and repository name).
apt-get install make python-dev python-virtualenv \
    mercurial unzip
The source code is hosted on bitbucket, let clone it into some directory and setup virtual environment (this will download all necessary package dependencies per framework listed above).
hg clone https://bitbucket.org/akorn/helloworld
cd helloworld/03-urls && make env
Once environment is ready we can run benchmarks:
env/bin/python benchmarks.py

Tuesday, October 9, 2012
Python Web Routing Benchmark
How fast python web framework process routing (some calls this URL dispatch)? A typical web application usually has the following routes:
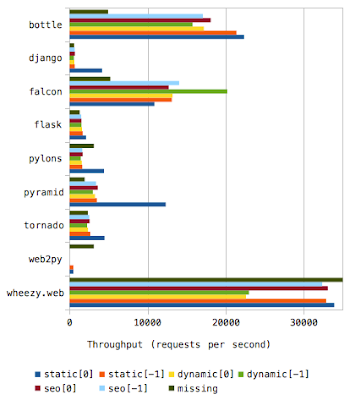
- Static: the URL path is fixed and never changes, e.g. https://bitbucket.org/explore.
- Dynamic: the URL path is constructed dynamically and can include semantic information, e.g. https://bitbucket.org/jsmith/dotfiles/downloads, in this case jsmith is user, dotfiles a name of source repository, downloads - feature.
- SEO: localization and internationalization is sort of must have for modern web applications, can combine two above.
- Missing: that always happen, url changed and resource is not available anymore. What is impact of handing a non-existing path?
- bottle 0.11.6
- django 1.6
- falcon 0.1.7
- flask 0.10.1
- pylons 1.0.1
- pyramid 1.5a2
- tornado 3.1.1
- web2py 2.2.1
- wheezy.web 0.1.373
apt-get install make python-dev python-virtualenv \
    mercurial unzip
The source code is hosted on bitbucket, let clone it into some directory and setup virtual environment (this will download all necessary package dependencies per framework listed above).
hg clone https://bitbucket.org/akorn/helloworld
cd helloworld/02-routing && make env
Once environment is ready we can run benchmarks:
env/bin/python benchmarks.py

Thursday, October 4, 2012
apt-get: update only required translations
apt Acquire::Languages can be set to declare which translations you want downloading. The variable "environment" specifies that apt should check $LC_MESSAGES. Here we go:
# eliminate any lists you might have
rm -rf /var/lib/apt/lists/
# set languages you need
echo 'Acquire::Languages { "environment"; "en"; };' > \
  /etc/apt/apt.conf.d/99lang
# update lists
apt-get update
If you need just English, it is okay just remove apt lists.
Tuesday, September 18, 2012
Python Fastest Web Framework
What is the fastest web framework for Python? In this post we will examine a trivial 'Hello World!'. See also:

- Performance Benchmarks
- Code Quality
- Template Engines
- bobo 1.0.0
- bottle 0.11.6
- cherrypy 3.2.4
- circuits 2.1.0
- django 1.5.1
- flask 0.9
- pyramid 1.4
- tornado 3.0.1
- turbogears 2.2.0
- web.py 0.37
- web2py 2.1.1
- wheezy.web 0.1.365
apt-get install make python-dev python-virtualenv \
    mercurial unzip

# Up TCP connection limits
sysctl net.core.somaxconn=2048
sysctl net.ipv4.tcp_max_syn_backlog=2048
The source code is hosted on bitbucket, let clone it into some directory and setup virtual environment (this will download all necessary package dependencies per framework listed above).
hg clone https://bitbucket.org/akorn/helloworld
cd helloworld/01-welcome && make env
The make file has a target for each framework and runs particular example in uWSGI, e.g. in order to run django application just issue make django.

Thursday, June 21, 2012
Troubleshooting slapd error: too many open files
Debian testing comes with openldap (slapd package) version 2.4.28. I noticed that ldap clients start receiving error and cannot contact ldap service any more. While the slapd daemon was running I found a number of errors in syslog (file /var/log/syslog):
... ldap1 slapd[4894]: SASL [conn=1611] Failure: GSSAPI
  Error: Unspecified GSS failure.  Minor code may
  provide more information (Too many open files)
... ldap1 slapd[4894]: warning: cannot open
  /etc/hosts.allow: Too many open files
... ldap1 slapd[4894]: warning: cannot open
  /etc/hosts.deny: Too many open files
... ldap1 slapd[4894]: SASL [conn=1611] Failure: GSSAPI
  Error: Unspecified GSS failure.  Minor code may
  provide more information (Too many open files)
Take a look at slapd process max open files soft limit:
cat /proc/`pidof slapd`/limitsCheck number of files open by slapd process:
pidof slapd | xargs lsof -a -p | wc -lThe slapd process must not exceed max open files soft limit. Take a look at files opened by slapd process:
pidof slapd | xargs lsof -a -p | tailHere is a sample output that shows there are a number of deleted files... actually one file /var/tmp/ldap_103.
slapd   4894 openldap  117u   REG  0,197 3371 705975
  /var/tmp/ldap_103 (deleted)
slapd   4894 openldap  118u   REG  0,197 3371 705975
  /var/tmp/ldap_103 (deleted)
slapd   4894 openldap  119u   REG  0,197 3371 705975
  /var/tmp/ldap_103 (deleted)
There is definitely a bug in slapd that cause max open files limit exceed.
Recycle Process
We can write a script that does a check and restart daemon if it reaches certain limit (file /usr/local/sbin/slapd-restart).
#!/bin/sh

# Restart slapd daemon if it has open more than 512 files
if [ `pidof slapd | xargs lsof -a -p | wc -l` -gt 512 ]
then
    /etc/init.d/slapd restart
fi
Let cron run this script hourly:
ln -s /usr/local/sbin/slapd-restart \
  /etc/cron.hourly/slapd-restart
If slapd process exceed max open files soft limit too quickly consider schedule cron job more frequently.
Mount /var/tmp in tmpfs
While slapd process creates small files in /var/tmp quite quickly I found reasonable to mount it with tmpfs (file /etc/fstab):tmpfs /var/tmp tmpfs noatime,nodev,noexec,nosuid,size=1M 0 0Restart slapd daemon so changes take place:
/etc/init.d/slapd stop
# Ensure the /var/tmp is empty
rm /var/tmp/ldap_103
mount /var/tmp
/etc/init.d/slapd start
# Ensure the /var/tmp mounted
df -h | grep /var/tmp
Ensure the /var/tmp mounted:
tmpfs 1.0M 4.0K 1020K 1% /var/tmpRegularly take a look a /var/log/syslog if there are any errors reported.
Thursday, June 7, 2012
Gnome Keyring: Location
Gnome keyring can automatically unlock passwords stored in the keyring. Gnome keyring include the following components: pkcs11, gpg, secrets, ssh. You can take a look at various passwords and keys stored by running (Alt + F2) seahorse.
Various keyrings are unlocked during user login. You can control which one by reviewing gnome startup application preferences, take a look by running gnome-session-properties.
The problem I faced with was related to the fact that keyring daemon place it runtime data into $HOME/.cache/keyring-* directory and over time there are quite a lot of them there. So while these data are session specific I would think it is most appropriate to store this information somewhere in temporary storage (e.g. /tmp) so it cleaned up. Fortunately you can define environment variable $XDG_RUNTIME_DIR that points to /tmp and that get it solved.
Various keyrings are unlocked during user login. You can control which one by reviewing gnome startup application preferences, take a look by running gnome-session-properties.
The problem I faced with was related to the fact that keyring daemon place it runtime data into $HOME/.cache/keyring-* directory and over time there are quite a lot of them there. So while these data are session specific I would think it is most appropriate to store this information somewhere in temporary storage (e.g. /tmp) so it cleaned up. Fortunately you can define environment variable $XDG_RUNTIME_DIR that points to /tmp and that get it solved.
echo "export XDG_RUNTIME_DIR=/tmp" > \
    /etc/profile.d/gnome-keyring.sh
The keyring daemon properly manage file permission so it owned and readable by user only. Once you reboot your computer the system level profile will setup environment variable for you so keyring cache will be created out there.
Friday, June 1, 2012
Debian APC UPS client-server monitoring
Apcupsd is a UPS control system that permits orderly shutdown of your computer in the event of a power failure. We will take a look at NIS (Network Information Server) server and client configuration (this is the case when a single UPS powers several computers).
Server
NIS (Network Information Server) mode allows communication between different hosts. Only one of those hosts, the server, needs to talk to the UPS directly.-
Ensure device is connected and recognized. In most cases your UPS is connected to server via USB cable. In Linux you can check this by listing USB devices (provided by usbhid driver):
deby1:~# ls /dev/usb/
hiddev0
If your device is no connected, most likely, you will get a message like this:ls: cannot access /dev/usb/: No such file or directory
Note, in our case the UPS device is available at /dev/usb/hiddev0. - Install UPS monitoring software. Apcupsd is a software designed to control APC UPS devices, let get it installed:
apt-get install apcupsd
- Configure apcupsd. Ensure the following settings (file /etc/apcupsd/apcupsd.conf):
UPSCABLE usb

UPSTYPE  usb
DEVICE   /dev/usb/hiddev0

NISIP    0.0.0.0
Let apcupsd daemon know it is configured (file /etc/default/apcupsd):ISCONFIGURED=yes
- Start apcupsd service:
/etc/init.d/apcupsd start
Check UPS status:apcaccess status <server name>
Take a look at any errors reported (file /var/log/apcupsd.events):... apcupsd 3.14.10 (...) debian startup succeeded
Client
The client computer will communicate with server via network.- Install UPS monitoring software.
apt-get install apcupsd
- Configure apcupsd. Ensure the following settings (file /etc/apcupsd/apcupsd.conf):
UPSCABLE ether

UPSTYPE net
#DEVICE  hostname:port
DEVICE  deby1.dev.local:3551

NETSERVER off
Let apcupsd daemon know it is configured (file /etc/default/apcupsd):ISCONFIGURED=yes
- Start apcupsd service:
/etc/init.d/apcupsd start
Notifications
You are able receive a number of notification events, e.g. power failure, etc (see a complete list of events here). By default apcupsd calls script located at /etc/apcupsd/apccontrol. This script echo some events to user console, as well as shuts down host per doshutdown event. You can easily extend this script to email you events. Here is the script (file /usr/local/sbin/notify.sh):
#!/bin/sh

domain=`hostname -d`
mail=root@$domain
msg=Test

if [ ! -z "$2" ]; then
    mail=$1; msg=$2
    if ! echo $mail | grep -q "$domain"; then
        mail=$mail@$domain
    fi
else
    if [ ! -z "$1" ]; then msg=$1; fi
fi

# strip whitespace at the end of message
msg=`echo "$msg" | sed 's/ *$//g'`

echo $msg | mail -s "$msg" $mail
echo $msg | wall
Ensure the following in apc event handler (file /etc/apcupsd/apccontrol):
#WALL=wall
WALL="xargs -0 notify.sh ups@dev.local"
This will email all events handled by apccontrol to ups@dev.local.
Friday, March 23, 2012
How to install PostgreSQL in Debian
PostgreSQL is an object-relational database management system.
Server
Installation in Debian is straight forward:apt-get install postgresqlThe installation adds a linux administrative user account postgres. You will need to set password (consider take a look how to generate a strong password here):
passwd postgresThere is also user postgres in database. The passwords for both should be different. Let change securely password for database user postgres (you will need this password to connect to database):
psql01:~# su - postgres
psql01:~$ psql
psql (9.1.3)
Type "help" for help.

postgres=# \password
Enter new password:
Enter it again:
postgres=# \q
Server Network Access
The installation configures the server to be available for local connections only. If you need this server to be accessible from other computers in your network follow these:- Ensure the server connection settings (file/etc/postgresql/9.1/main/postgresql.conf):
# - Connection Settings -
listen_addresses = '*'
- Allow incoming network connections (file
/etc/postgresql/9.1/main/pg_hba.conf):
# Allow remote connections to any database,
# for any user from 192.168.10.0/24 network.
host  all   all  192.168.10.0/24     md5
- Restart server so your changes take place:
/etc/init.d/postgresql restart
Client
pgAdmin III is a database design and management application for use with PostgreSQL (graphical tool). Let install it:apt-get install pgadmin3Try connect to the server you installed with user postgres and password set for database user.
Friday, February 17, 2012
Python Imaging Library Compiled
The compiled Python Imaging Library (version 1.1.7 for python 2.4-2.7 i386 and python 2.7 x86_64) can be found here. See the other post how to get it compiled in Debian.
Thursday, February 16, 2012
How to Install Python Imaging Library in Debian
If you need install Python Imaging Library into virtual environment under Debian you will need set location of several libraries (libfreetype, libjpeg). First of all let setup pre-requirements so we can compile PIL.
You can download pre-compiled version of PIL per this post.
apt-get -y install build-essential python-dev \
  python-virtualenv libbz2-dev zlib1g-dev \
  libfreetype6-dev libjpeg8-dev
The script below simplify PIL configuration/setup procedure.
# Download PIL and uzip it
wget http://effbot.org/downloads/Imaging-1.1.7.tar.gz
tar xzf Imaging-1.1.7.tar.gz

# create virtual environment
virtualenv env

ARCH=i386
#ARCH=x86_64

cd Imaging-1.1.7
# Set location of libjpeg8-dev
sed -e "s,JPEG_ROOT = None,JPEG_ROOT = '/usr/lib/$ARCH-linux-gnu',g" \
  setup.py > /tmp/x && mv /tmp/x setup.py

# Set location of zlib1g-dev
sed -e "s,ZLIB_ROOT = None,ZLIB_ROOT = '/usr/lib/$ARCH-linux-gnu',g" \
  setup.py > /tmp/x && mv /tmp/x setup.py

# Set location of libfreetype6-dev
sed -e "s,FREETYPE_ROOT = None,FREETYPE_ROOT = '/usr/lib/$ARCH-linux-gnu',g" \
  setup.py > /tmp/x && mv /tmp/x setup.py

# Proceed with installation into virtual environment
../env/bin/python setup.py install
The virtual environment is ready to be used with projects dependent on PIL, e.g. captcha, etc.
You can download pre-compiled version of PIL per this post.
Wednesday, February 15, 2012
How to Revert Broken Package in Debian
You just made upgrade of your Debian testing box and noticed something went wrong, some daemon not starting and you have no idea what to do until the bug will be fixed. Fortunately, you are able to revert broken package in Debian. Here we are going revert broken bind9 package version 1:9.8.1.dfsg.P1-2 and replace it with last known to work.
- We need to find last known to work version of the broken package. Take a look at
/var/log/apt/history.log. You should be able to find information about the package failed to install/configure:
Upgrade: ..., bind9:i386 (9.7.3.dfsg-1+b1,
9.8.1.dfsg.P1-2)...
So here version 9.7.3.dfsg-1+b1 is replaced by 9.8.1.dfsg.P1-2. Thus we found last working version. - Since we know version (9.7.3.dfsg-1+b1) of the bind9 package we can install it from snapshot.debian.org. Go to that site and search for your package. You will get a list of various versions available.
Follow link for with version that you found previously. You will get a list of various options, including source, architecture specific files, etc.
bind9_9.7.3.dfsg-1+b1_i386.deb
Seen in debian on 2011-04-20 22:16:02 in
/pool/main/b/bind9.
Follow link /pool/main/b/bind9. In my case it was:http://snapshot.debian.org/archive/debian/20110420T221602Z/pool/main/b/bind9/
- Add snapshot url to file /etc/apt/sources.list:
deb http://snapshot.debian.org/archive/debian/20110420T221602Z testing main
- Update your apt repository with the following command:
apt-get -o Acquire::Check-Valid-Until=false update
- Have a look at updated package information:
apt-cache showpkg bind9
You should be able to see something like this:Versions: 1:9.8.1.dfsg.P1-2 ... 1:9.7.3.dfsg-1 ...
1:9.7.3.dfsg-1 is the version we need. - Remove broken package and related dependencies:
apt-get remove bind9
apt-get autoremove
- Install version we need:
apt-get install bind9=1:9.7.3.dfsg-1
Since it complains:The following packages have unmet dependencies: bind9 : Depends: bind9utils (= 1:9.7.3.dfsg-1) but 1:9.8.1.dfsg.P1-2 is to be installed
... let add that one dependency for bind9utils as well.apt-get install bind9=1:9.7.3.dfsg-1 bind9utils=1:9.7.3.dfsg-1
Package pinning
We will use apt pinning feature to prevent packages from being upgraded. Just create a file /etc/apt/preferences.d/bind9 and add the following:
Package: bind9
Pin: version 1:9.7.3*
Pin-Priority: 1001

Package: bind9utils
Pin: version 1:9.7.3*
Pin-Priority: 1001
The next time you run upgrade these two packages remain untouched.
Wednesday, December 21, 2011
How to Convert APE+CUE to MP3
There is no a single tool to convert a APE file to a number of mp3 tracks. We are going to convert ape file to wav first, than wav to mp3 (a single file) and finally cut a single mp3 file into several (per CUE file). We need several packages. Two of them (libmac2 monkey-audio) are from debian-multimedia, choose mirror from the following list. You need to install debian-multimedia-keyring package. In my case I have obtained it from here:
http://mirror.yandex.ru/debian-multimedia/pool/main/d/deb-multimedia-keyring/Download debian-multimedia-keyring_2010.12.26_all.deb file (in your case the file can be newer) and install:
dpkg -i debian-multimedia-keyring_2010.12.26_all.debOnce above is done we need to add debian-multimedia repository location to apt source list and update it:
echo "deb http://mirror.yandex.ru/debian-multimedia/ testing main non-free" \
    >> /etc/apt/sources.list
apt-get update
Install required packages:
apt-get -y install libmac2 monkeys-audio shntool \
    lame mp3splt
Here is a script that does the rest (file ape-mp3.sh):
#!/bin/sh

# Convert APE to WAV
shnconv -o wav CDImage.ape
# Convert WAV to MP3 VBR
lame -h -v --preset cd CDImage.wav CDImage.mp3
rm CDImage.wav
# Split file
mp3splt -a -d mp3 -c CDImage.ape.cue -o \
    @a/@b/@n-@a-@t CDImage.mp3
rm CDImage.mp3
Drop that file into a directory that has two files input CDImage.ape and CDImage.ape.cue. Run the script and in few minutes you will get a mp3 directory with your tracks.
Troubleshooting: mp3splt does not set ID3 tags
As of this writing Debian testing comes with mp3splt version 2.2.5-1. The problem has been fixed since version 2.3. So in order to install latest version you need to add the following to /etc/apt/sources.list:
echo "deb http://mp3splt.sourceforge.net/repository wheezy main" \
    >> /etc/apt/sources.list
apt-get update
Note that you need remove previously installed packages related to mp3splt:
apt-get remove libmp3splt-mp3 libmp3splt-ogg \
    libmp3splt0 mp3splt
Install latest:
apt-get install libmp3splt0-mp3 libmp3splt0-ogg \
    libmp3splt0 mp3splt
Tuesday, November 22, 2011
Using Buildbot with Multiple Projects
The BuildBot is a system to automate the compile/test cycle required
to validate code changes. Here we are going setup buildbot master and slaves
with the following requirements:
- We have serveral projects: project1, project2, project3
- These projects live under Mercurial (e.g. hosted at bitbucket.org) with base url https://scm.dev.local/hg/ followed by project name (e.g. https://scm.dev.local/hg/project1)
- We should be able run at least 2 builds in parallel (this is where we can use buildbot slaves: linux-slave1 and linux-slave2)
- The build should trigger automatically if the changes detected every 30 minutes during working day.
- The builder should execute make all that ultimatelly does everything we need to verify integrity.
- The builder should be checked agains certain python versions: 2.4, 2.5, 2.6, 2.7 and 3.2
Monday, September 12, 2011
How to chroot SFTP (Secure File Transfer)
SFTP (SSH File Transfer Protocol) is a network protocol that provides file transfer functionality over reliable data stream. It has nothing related with old ftp protocol however it treated as a secure replacement. Here we are going to achieve the following:
- Service root directory: /srv/sftp
- Each user must have isolated sftp location, e.g. /srv/sftp/user1
- User top level directory include directories: files, archive
- User session is chrooted
- User is limited to sftp only, no shell, no ssh access
apt-get -y install ssh
SSH Configuration for SFTP
You need to ensure the sftp subsystem is enabled in ssh. We are going to use internal-sftp implementation, that is in-process ssh subsystem (file /etc/ssh/sshd_config):#Subsystem sftp /usr/lib/openssh/sftp-server Subsystem sftp internal-sftpLet use sftp group to identify users for sftp. Here is a matching rule for ssh, add it at the end of /etc/ssh/sshd_config file:
Match group sftp
    ChrootDirectory /srv/sftp/%u
    X11Forwarding no
    AllowTcpForwarding no
    MaxAuthTries 2
    ForceCommand internal-sftp
Restart ssh so the changes take place:
/etc/init.d/ssh restart
Users
Let create a security group for our sftp users:groupadd sftpHere is a script that does the rest (file sftp-add.sh).
#!/bin/bash

sftproot=/srv/sftp

genpasswd() {
    local l=$1
    [ "$l" == "" ] && l=20
    tr -dc A-Za-z0-9_ < /dev/urandom \
        | head -c ${l} | xargs
}

if [ -z $1 ]; then
    echo "Usage $0 username"
    exit 1
fi

# 1. User is created with home directory set to /,
# this is the directory sftp change once chroot.
# 2. User added to group sftp.
# 3. Do not create home directory.
# 4. User has no shell, ssh login impossible.
useradd -d / -G sftp -M -s /bin/false $1

echo "Auto generated password:"
genpasswd
passwd $1

mkdir -p $sftproot/$1/{files,archive}
# Chroot directory must be owned by root
chown root:$1 $sftproot/$1
# User has read-only access
chmod -R 750 $sftproot/$1
# User owns everything below chroot directory
chown $1:$1 $sftproot/$1/*
Just invoke it this way:
./sftp-add.sh user1Now you should be able use sftp.
Monday, September 5, 2011
How to Compile Python from Source
Here we are going compile python from source. I assume you have a clean installation of Debian testing. Here are few packages required for compilation.
apt-get -y install build-essential zlib1g-dev libbz2-dev \
    libncurses5-dev libreadline-gplv2-dev libsqlite3-dev \
    libssl-dev libgdbm-dev
Once above installation is complete, download python source code from here: http://www.python.org/ftp/python/.
Suppose you choose to download python 2.5.2.
cd /usr/local/src
wget http://www.python.org/ftp/python/2.5.2/Python-2.5.2.tar.bz2
tar xjf Python-2.5.2.tar.bz2
cd Python-2.5.2
Since most of libraries in Debian moved from /usr/lib to /usr/lib/i386-linux-gnu we need create symbolic links in old location so the build scripts can find them all. This is far easier than specify a valid library location for each case. Here are links:
ln -s /usr/lib/i386-linux-gnu/libssl.so \
    /usr/lib/libssl.so
ln -s /usr/lib/i386-linux-gnu/libcrypt.so \
    /usr/lib/libcrypt.so
ln -s /usr/lib/i386-linux-gnu/libcrypto.so  \
    /usr/lib/libcrypto.so
ln -s /usr/lib/i386-linux-gnu/libbz2.so  \
    /usr/lib/libbz2.so
ln -s /usr/lib/i386-linux-gnu/libgdbm.so  \
    /usr/lib/libgdbm.so
ln -s /usr/lib/i386-linux-gnu/libcurses.so  \
    /usr/lib/libcurses.so
ln -s /usr/lib/i386-linux-gnu/libz.so  \
    /usr/lib/libz.so
ln -s /usr/lib/i386-linux-gnu/libsqlite3.so  \
    /usr/lib/libsqlite3.so
Compilation
Before we start compile we need to configure it first. You can run it with all defaults (this will install python to /usr/local/)../configureOr you can specify some other location:
./configure --prefix=/usr/localThe configuration process take few seconds. Next issue make command to actually compile it (this may take few minutes). The -s option prints warning only and -j 2 utilizes 2 CPU cores during the compilation).
make -s -j 2You can optionally test it before installing with:
make testor run specific tests of your interest:
./python Lib/test/test_hashlib.py
Install
make installPython executable should be located at /usr/local/bin/python2.5.
Extra Packages
While python is perfectly working at this moment you might need install some extra packages (e.g. virtualenv) with easy_install.wget -O - -q http://python-distribute.org/distribute_setup.py | python2.5 easy_install-2.5 virtualenvThis way you can install as many python versions as you like.
Troubleshooting
While working with some third party package (e.g. django) you got the following error:ImportError: ...undefined symbol: PyUnicodeUCS2_ReplaceThere reason is described here. You have to re-configure the python:
./configure --enable-unicode=ucs4and build/install it again.
Subscribe to:
Posts
(
Atom
)


 Posts
Posts


